Kubernetes Example
Kubernetes를 공부하면서 K3s를 활용하여 간단하게 예제를 만들어봤다. 컨테이너의 강력함이야 진즉에 알고 있었는데, 쿠버네티스. 정말 편하다. 정말 편하고 좋은데.. 2005년 밤을 새우면서 어렵게 Scale Out 했던 기억, 로그를 조금이라도 편하게 볼라고 밤을 새우면서 툴을 개발했던 기억이 떠올라 잠깐 현타가 왔다. 뭐 운영 수준은 또 다른 얘기겠지만, 이젠 진짜 뭐든 마음만 먹으면 쉽게 만들어 볼 수는 있는 세상이 된 것 같다.
Kubernetes Example
Web Application
- Rust 기반 Web Framework인 Yew의 예제 Application

Web Application의 Docker Image를 Docker Hub에 업로드
- 개발 환경을 yew라는 이름의 Docker Image로 생성
FROM ubuntu:20.04
SHELL ["/bin/bash", "-c"]
RUN apt update
RUN apt install -y vim
RUN apt install -y net-tools
RUN apt install -y iputils-ping
RUN apt install -y curl
RUN apt install -y git
RUN apt install -y build-essential
RUN curl --proto '=https' --tlsv1.2 -sSf https://sh.rustup.rs >> install_rust.sh && chmod 700 install_rust.sh && ./install_rust.sh -y
ENV PATH="/root/.cargo/bin:${PATH}"
RUN cargo install wasm-pack
RUN cargo install trunk
RUN rustup target add wasm32-unknown-unknown
RUN cd /root && git clone https://github.com/yewstack/yew.git
ENTRYPOINT ["/bin/bash"]
version: '3'
services:
  yew:
    container_name: yew
    image: yew:0.1.0
    build: .
    ports:
    - 8080:8080
    stdin_open: true
    tty: true
- 개발 환경 Docker Image 위에 올린 Web Application을 yew-boids이라는 이름의 Docker Image로 생성
FROM yew:0.1.0
ENTRYPOINT ["trunk", "serve"]
CMD ["/root/yew/examples/boids/index.html", "--release", "--address", "0.0.0.0"]
version: '3'
services:
  yew-boids:
    container_name: yew-boids
    image: yew-boids:0.1.0
    build: .
    ports:
    - 8080:8080
    stdin_open: true
    tty: true
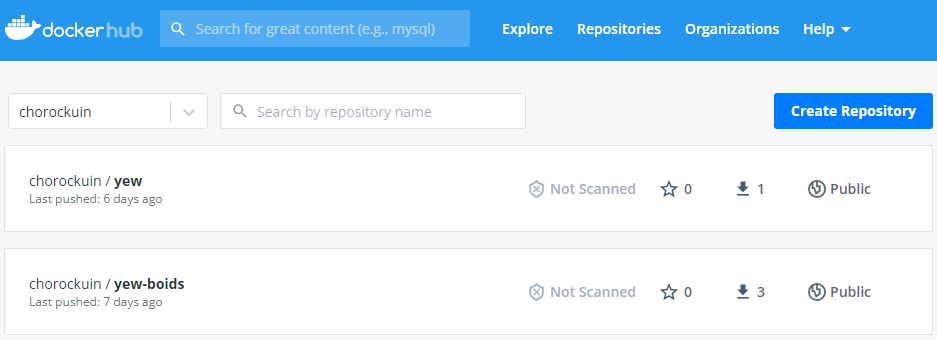
- Docker Hub에 yew Docker Image와 yew-boids Docker Image를 업로드
Kubernetes 활용하여 Web Application 배포
- VM 구성
- master1
- 10.0.2.10
- 192.168.56.10
- m1-worker1
- 10.0.2.11
- 192.168.56.11
- m1-worker2
- 10.0.2.12
- 192.168.56.12
- master1
- master1에 K3s 설치
curl -sfL https://get.k3s.io | INSTALL_K3S_EXEC=" \
server --cluster-init \
--disable traefik \
--disable metrics-server \
--node-name master1 --docker" \
INSTALL_K3S_VERSION="v1.20.0-rc4+k3s1" sh -s –
rm -rf ~/.kube
mkdir ~/.kube
sudo cp /etc/rancher/k3s/k3s.yaml ~/.kube/config
sudo chown -R $(id -u):$(id -g) ~/.kube
echo "export KUBECONFIG=~/.kube/config" >> ~/.bashrc
source ~/.bashrc
kubectl cluster-info
kubectl get node -o wide
sudo cat /var/lib/rancher/k3s/server/node-token
kubectl get node master1 -ojsonpath="{.status.addresses[0].address}"
- m1-worker1에 K3s Agent 설치
NODE_TOKEN=K10c943aeb054729b3be32e080d62a7b81c0ae0920c11cff509ebbb671450333fb2::server:7a7f6384e366e3dbffdaf57a858bfa6f
MASTER_IP=10.0.2.10
echo $NODE_TOKEN
echo $MASTER_IP
curl -sfL https://get.k3s.io | K3S_URL=https://$MASTER_IP:6443 \
K3S_TOKEN=$NODE_TOKEN \
INSTALL_K3S_EXEC="--node-name m1-worker1 --docker" \
INSTALL_K3S_VERSION="v1.20.0-rc4+k3s1" sh -s –
- m1-worker2에 K3s Agent 설치
NODE_TOKEN=K10c943aeb054729b3be32e080d62a7b81c0ae0920c11cff509ebbb671450333fb2::server:7a7f6384e366e3dbffdaf57a858bfa6f
MASTER_IP=10.0.2.10
echo $NODE_TOKEN
echo $MASTER_IP
curl -sfL https://get.k3s.io | K3S_URL=https://$MASTER_IP:6443 \
K3S_TOKEN=$NODE_TOKEN \
INSTALL_K3S_EXEC="--node-name m1-worker2 --docker" \
INSTALL_K3S_VERSION="v1.20.0-rc4+k3s1" sh -s –
- Load Balancer 설정을 위해 metallb 설치
kubectl apply -f https://raw.githubusercontent.com/metallb/metallb/v0.12.1/manifests/namespace.yaml
kubectl get all -n metallb-system
kubectl apply -f https://raw.githubusercontent.com/metallb/metallb/v0.9.6/manifests/metallb.yaml
kubectl create secret generic -n metallb-system memberlist --from-literal=secretkey="$(openssl rand -base64 128)"
kubectl apply -f metallb-config.yaml
- Name Space 작성
apiVersion: v1
kind: Namespace
metadata:
  name: my-yew-app-nms
---
- Deployment 작성
apiVersion: apps/v1
kind: Deployment
metadata:
  name: my-yew-app-dpl
  namespace: my-yew-app-nms
  labels:
    app: my-yew-app-dpl
spec:
  replicas: 3
  selector:
    matchLabels:
      app: my-yew-app-pod
  template:
    metadata:
      name: my-yew-app-pod
      namespace: my-yew-app-nms
      labels:
        app: my-yew-app-pod
    spec:
      containers:
      - name: my-yew-app
        image: chorockuin/yew-boids:0.1.0
        ports:
        - containerPort: 8080
---
- Service 작성
apiVersion: v1
kind: Service
metadata:
  name: my-yew-app-svc
  namespace: my-yew-app-nms
  labels:
    app: my-yew-app-svc
spec:
  ports:
  - port: 80
    targetPort: 8080
    nodePort: 30000
  type: LoadBalancer
  selector:
    app: my-yew-app-pod
- 배포
kubectl apply -f my-yew-app.yaml
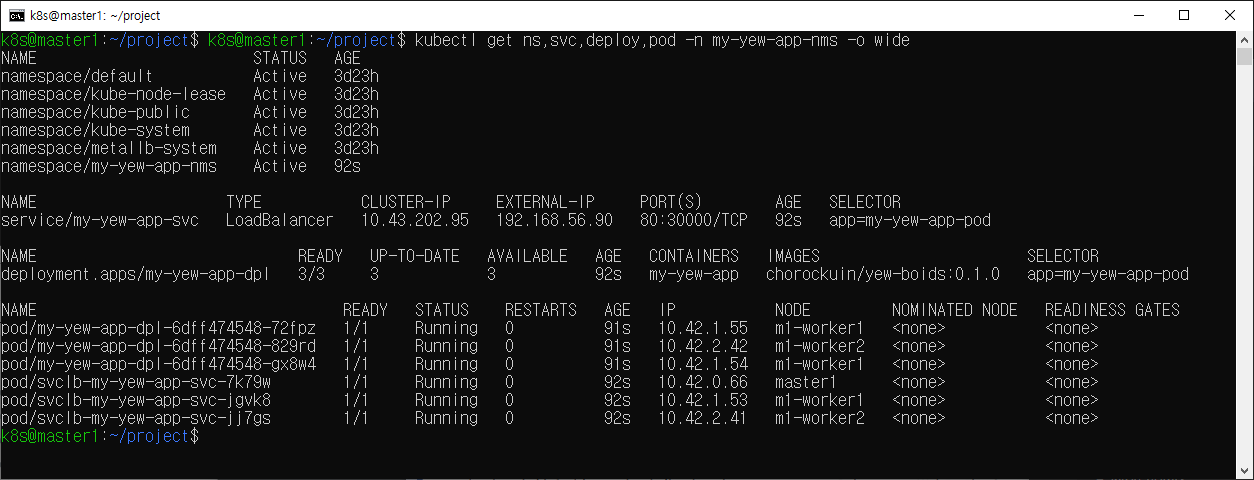
- Load Balancer 192.168.56.90에서 Web Application 정상 동작

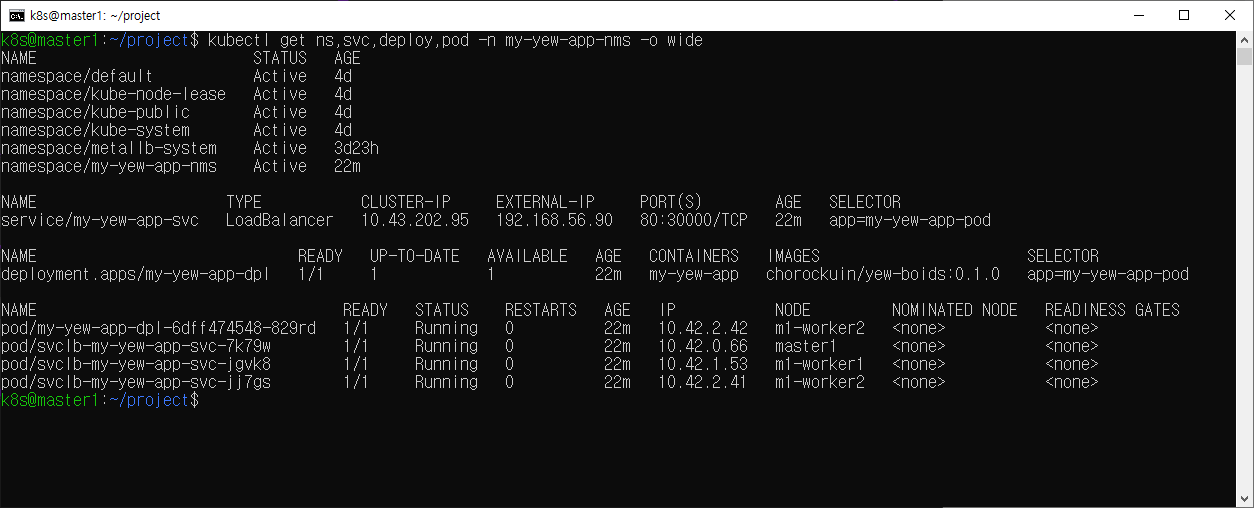
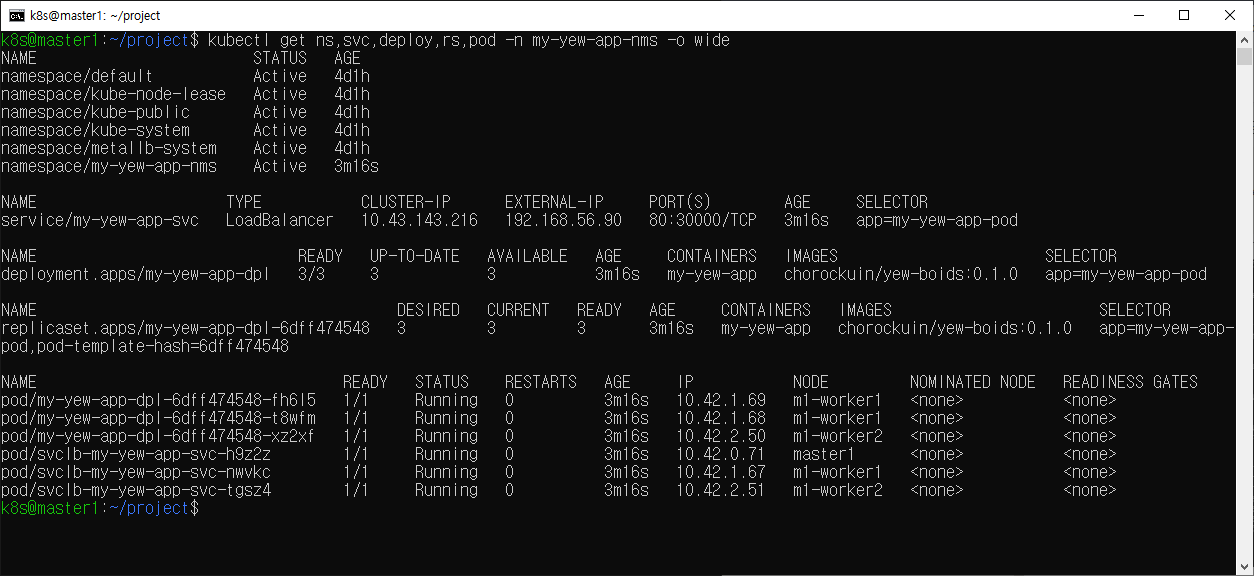
- Scale In
kubectl scale deploy -n my-yew-app-nms my-yew-app-dpl --replicas=1
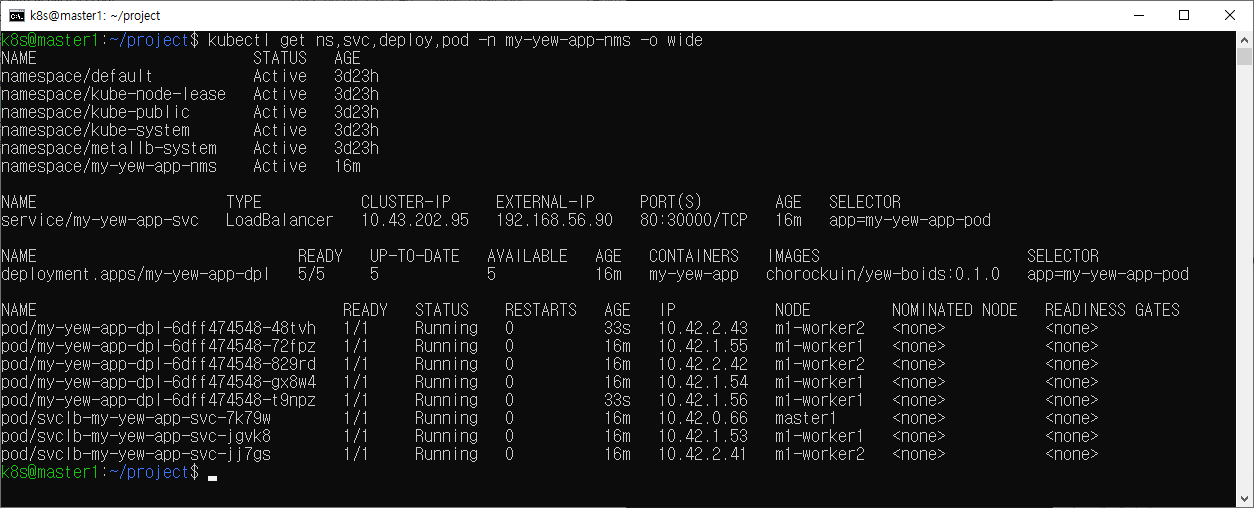
- Scale Out
kubectl scale deploy -n my-yew-app-nms my-yew-app-dpl --replicas=5
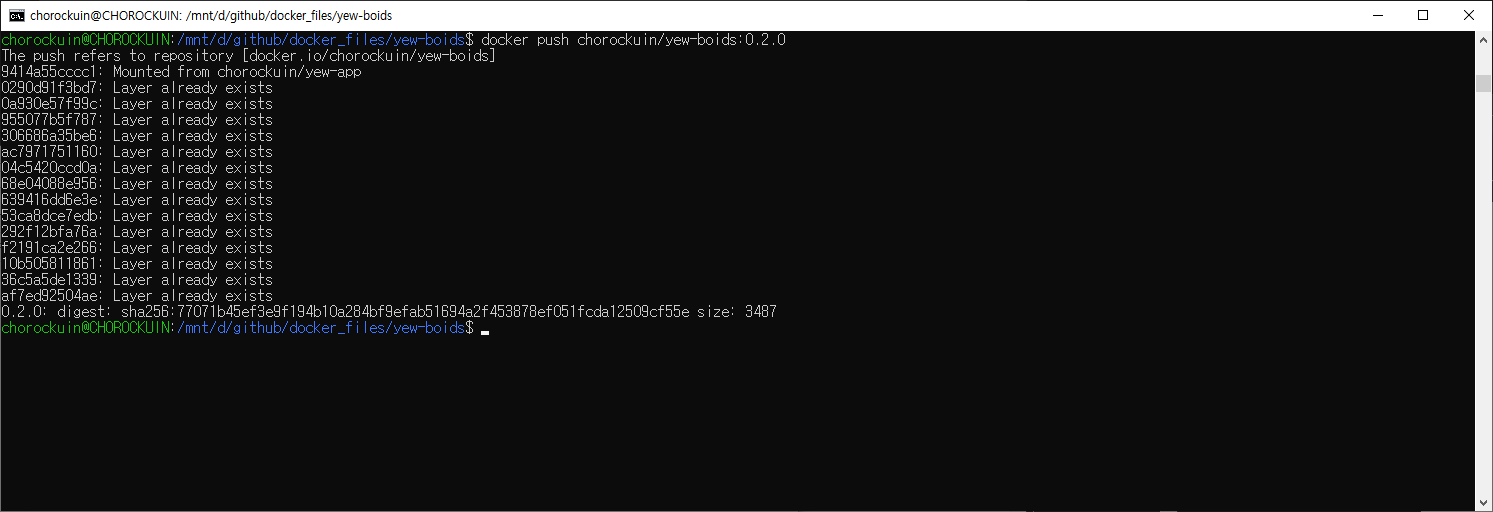
- 0.2.0 버전 Docker Image Build
docker build -t chorockuin/yew-boids:0.2.0
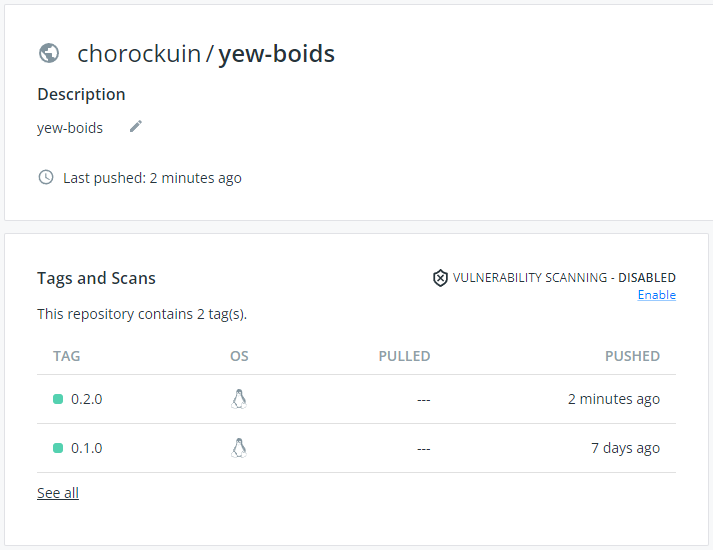
- Docker Hub에 Push
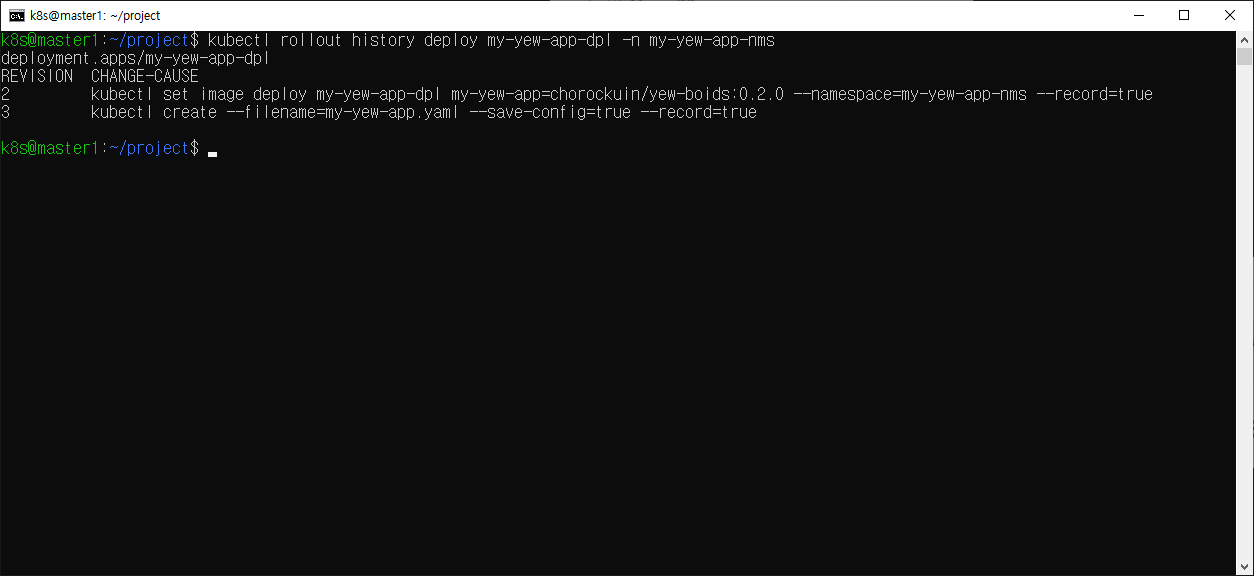
- History 설정
kubectl create -f my-yew-app.yaml --save-config --record
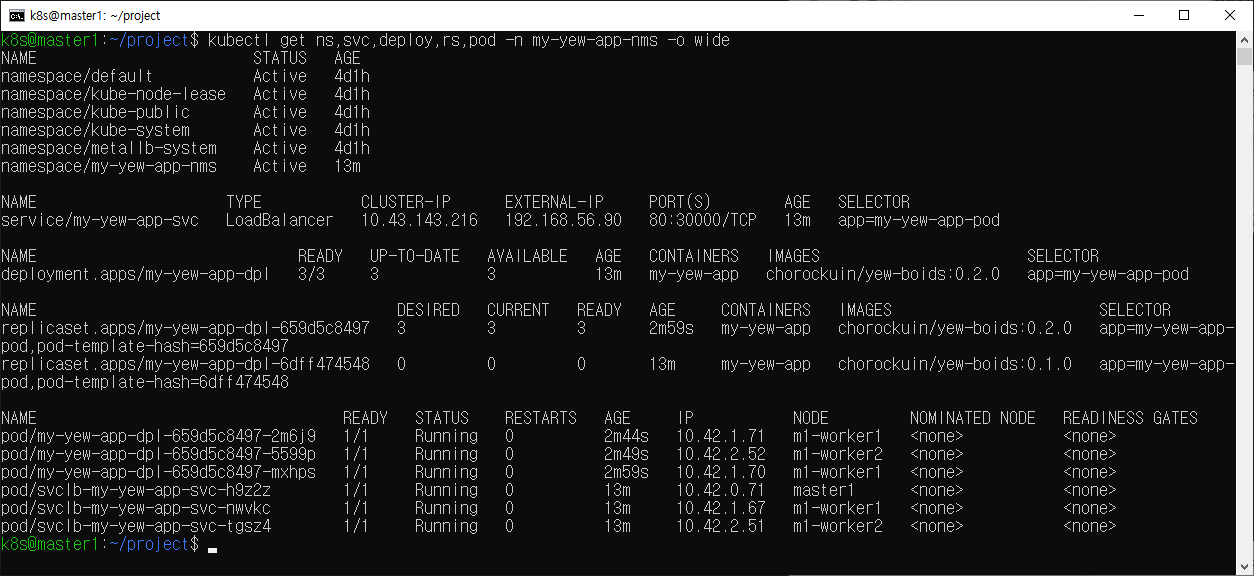
- Rolling Update
kubectl set image deploy my-yew-app-dpl -n my-yew-app-nms my-yew-app=chorockuin/yew-boids:0.2.0 --record

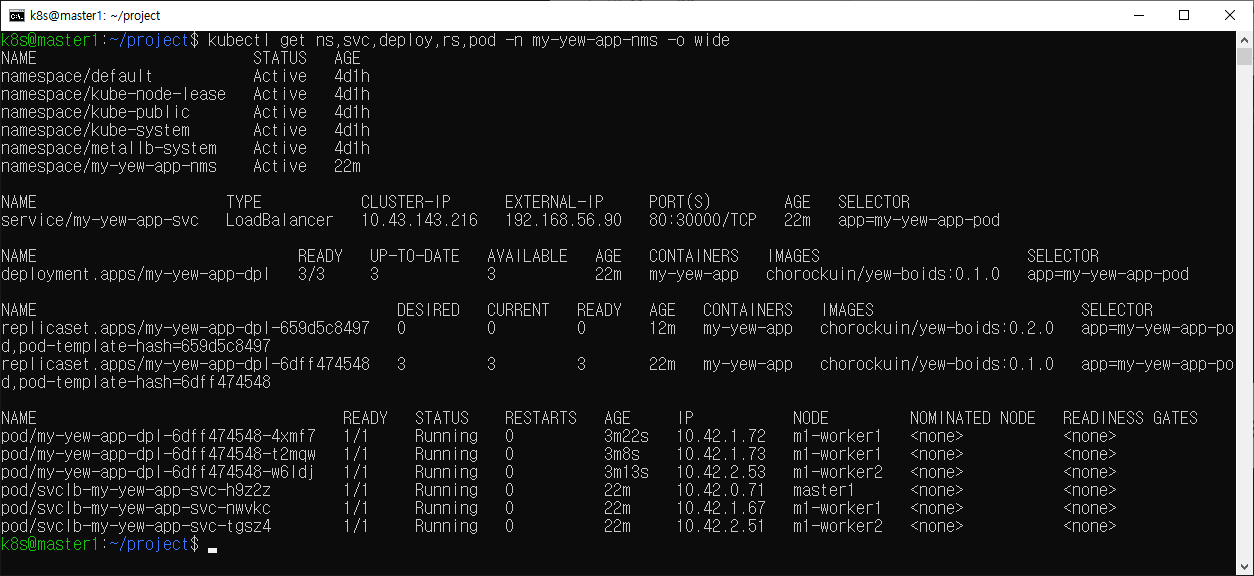
- Rolling Back
kubectl rollout undo deploy my-yew-app-dpl -n my-yew-app-nms --to-revision=1
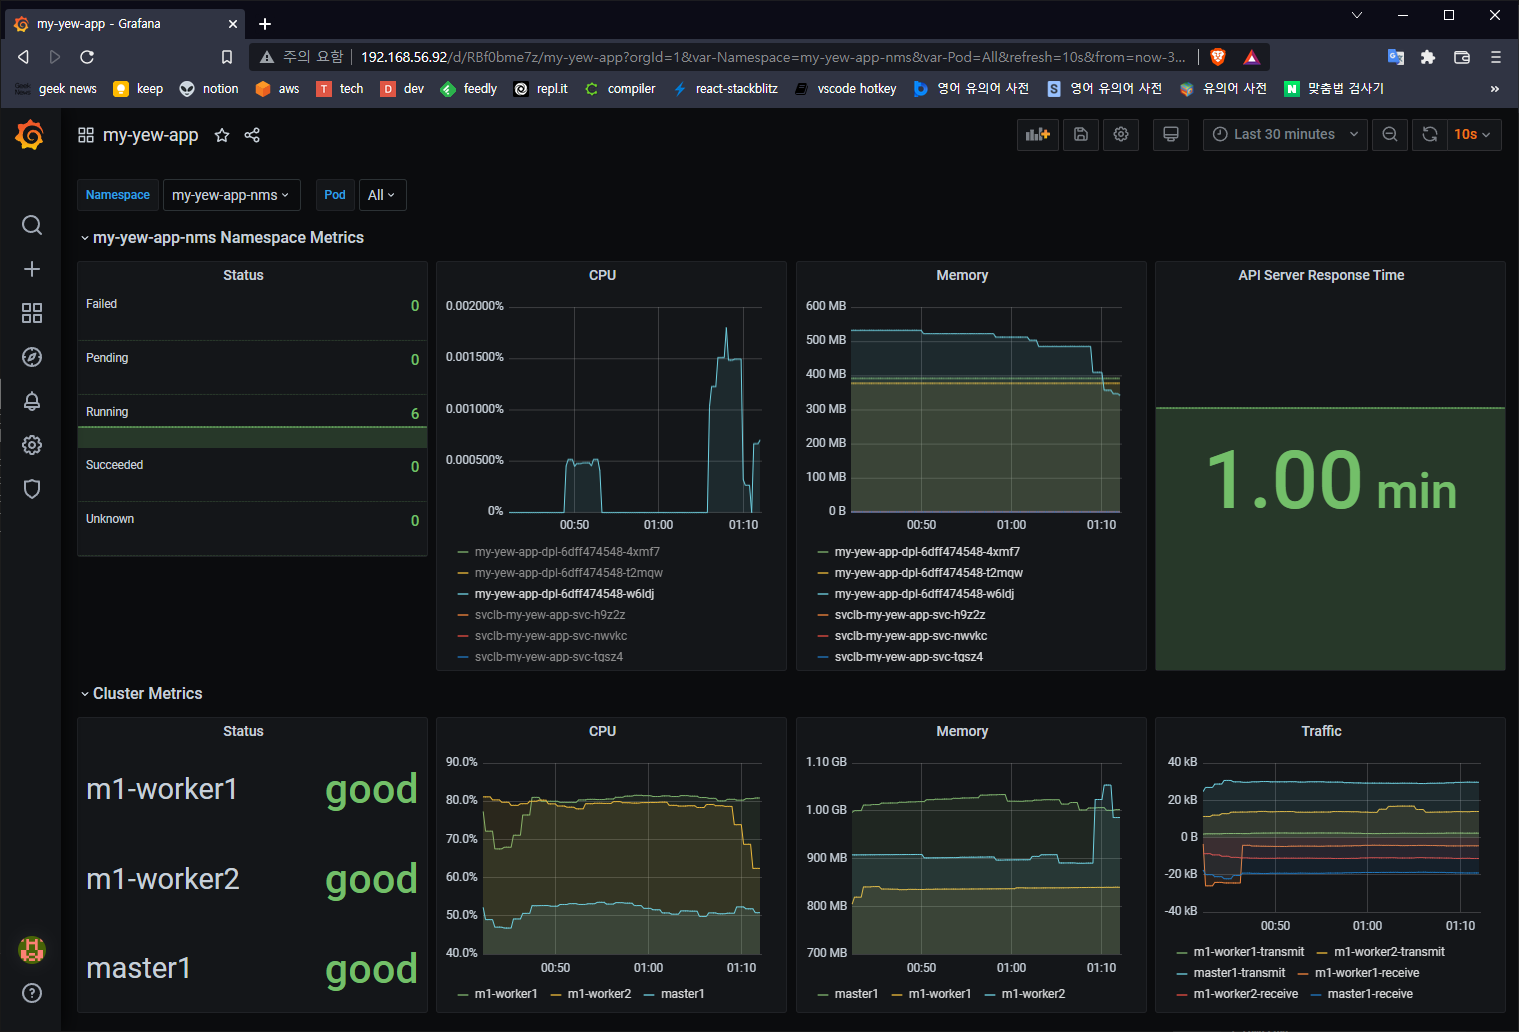
Prometheus, Grafana 활용하여 배포한 Application 모니터링
- NFS VM 구성
- nfs
- 10.0.2.30
- 192.168.56.30
- nfs
- helm 설치
curl -fsSL -o get-helm.sh https://raw.githubusercontent.com/helm/helm/master/scripts/get-helm-3
chmod 700 get-helm.sh
./get_helm.sh
rm get-helm.sh
helm version
- nfs-subdir-external-provisioner 설치
helm repo add nfs-subdir-external-provisioner https://kubernetes-sigs.github.io/nfs-subdir-external-provisioner/
helm repo update
helm install nfs-subdir-external-provisioner nfs-subdir-external-provisioner/nfs-subdir-external-provisioner --set nfs.server=192.168.56.30 --set nfs.path=/home/k8s/share
- Prometheus 용 NFS PVC
apiVersion: v1
kind: PersistentVolumeClaim
metadata:
  name: prometheus-server
spec:
  accessModes:
    - ReadWriteMany
  resources:
    requests:
      storage: 4Gi
  storageClassName: nfs-client
- Grafana 용 NFS PVC
apiVersion: v1
kind: PersistentVolumeClaim
metadata:
  name: grafana
spec:
  accessModes:
    - ReadWriteMany
  resources:
    requests:
      storage: 2Gi
  storageClassName: nfs-client
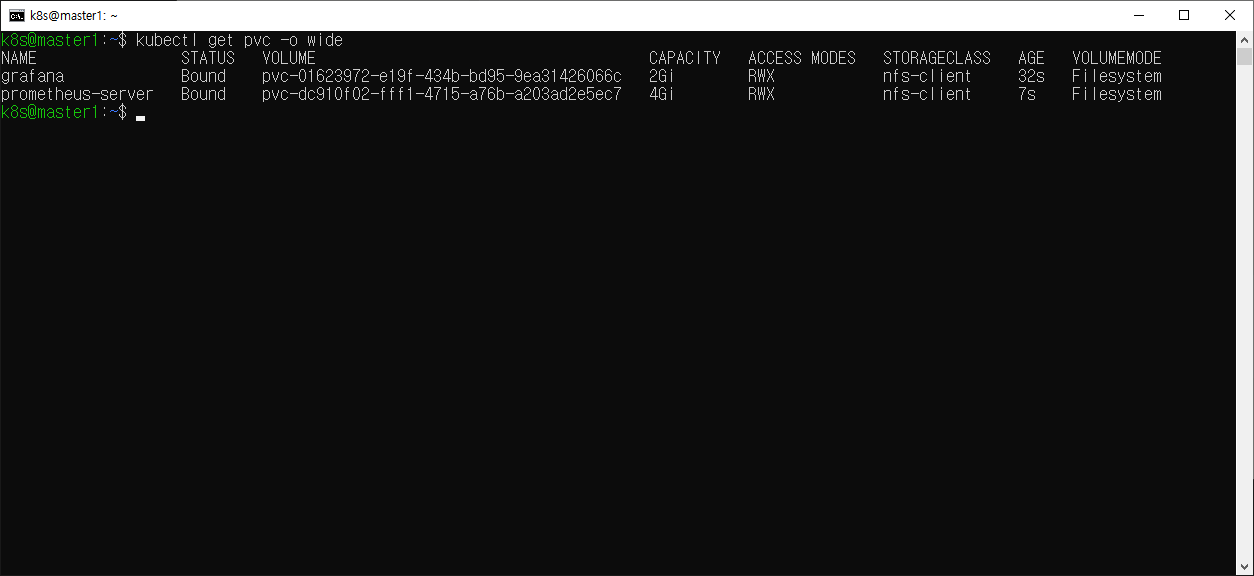
- Prometheus 설치
helm repo add edu https://iac-source.github.io/helm-charts
helm repo update
helm install prometheus edu/prometheus \
--set pushgateway.enabled=false \
--set alertmanager.enabled=false \
--set nodeExporter.tolerations[0].key=node-role.kubernetes.io/master \
--set nodeExporter.tolerations[0].effect=NoSchedule \
--set nodeExporter.tolerations[0].operator=Exists \
--set server.persistentVolume.existingClaim="prometheus-server" \
--set server.securityContext.runAsGroup=1000 \
--set server.securityContext.runAsUser=1000 \
--set server.service.type="LoadBalancer" \
--set server.extraFlags[0]="storage.tsdb.no-lockfile"
- Grafana 설치
helm repo add edu https://iac-source.github.io/helm-charts
helm repo update
helm install grafana edu/grafana \
--set persistence.enabled=false \
--set persistence.existingClaim=grafana \
--set service.type=LoadBalancer \
--set securityContext.runAsUser=1000 \
--set securityContext.runAsGroup=1000 \
--set adminPassword="admin"
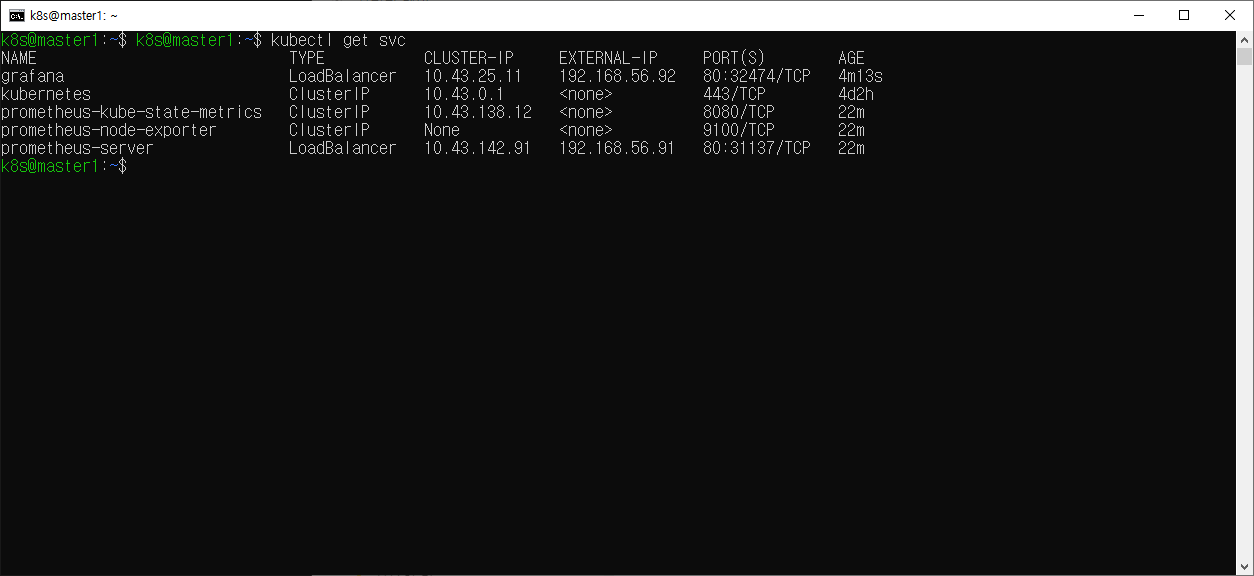
- Granfa 192.168.56.92 접속
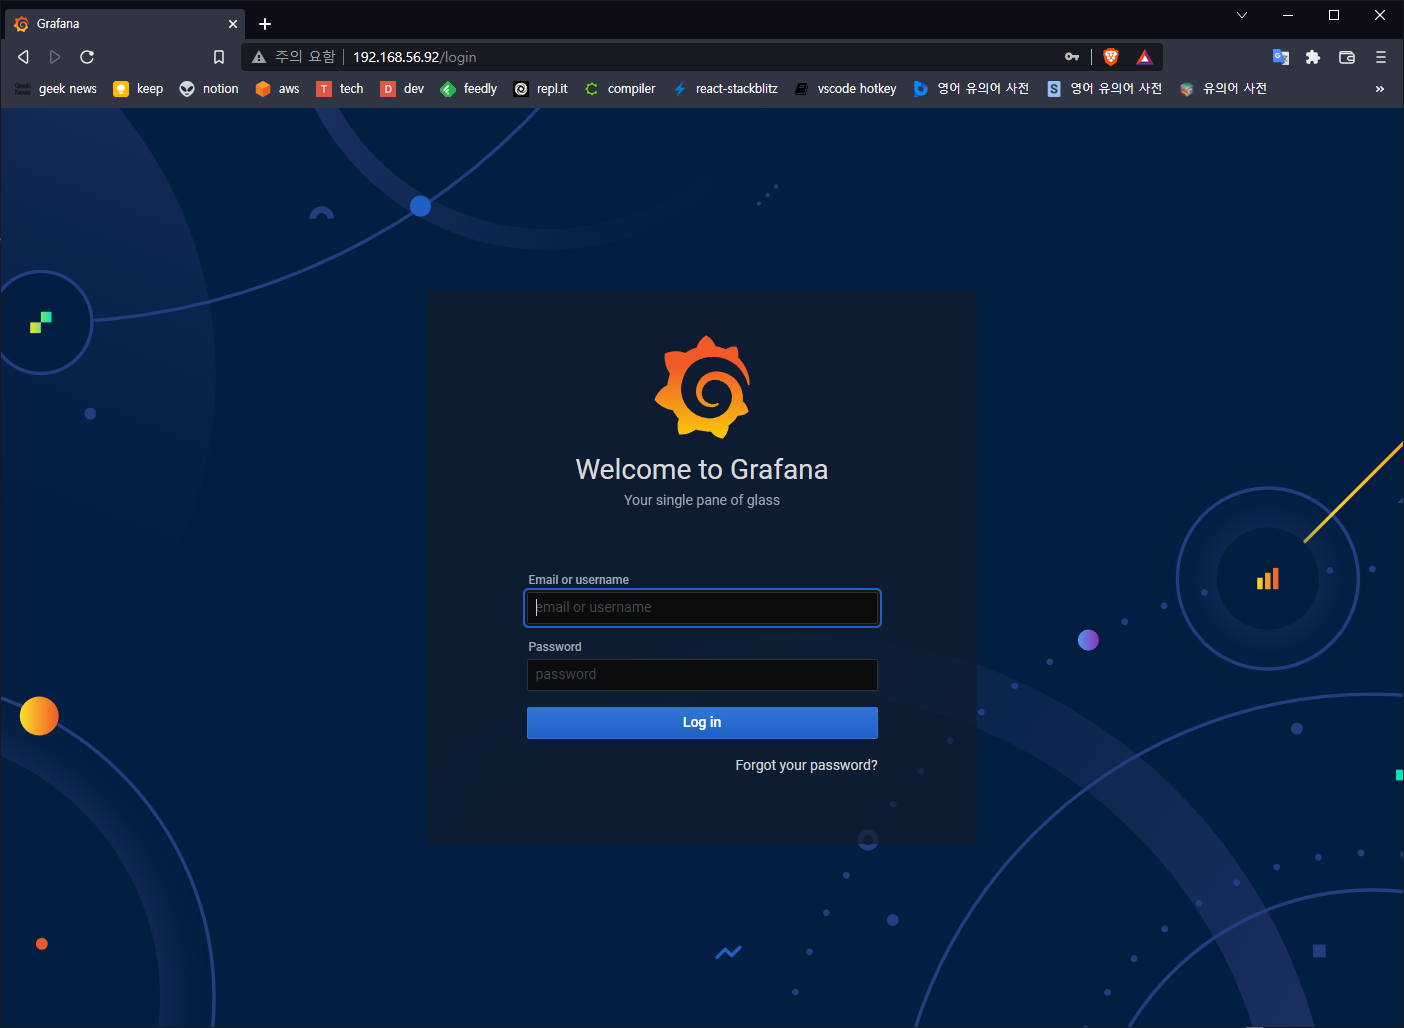
- Pannel 설정 후 Cluster 및 my-yew-app-nms Namespace 모니터링